
The thing about bending - it's a Forest thing
Whilst I'll be the first to admit, we fitter's like what we know, and we know what we like. Getting us to change products is a major step out of our comfort zone, and we don't like that. Let's face it - we are all experts with the particular track we use.
BUT we do like to see new things, and quite a few fitters up and down the country have signed up to Forest curtain tracks and one of the attractions is the ability to bend these aluminium tracks on-site with the bending machine. At £245 this machine is a tiny investment compared to the Silent Gliss bending machine at £1,190 (2021), but a bit more than the Integra hand bending former and filler strips at £89.

The Integra former and filler set ( see left) enables you to bend Integra Regular mild steel track, by hand and by eye. The track will not reverse bend, and bend angle is limited

The Silent Gliss 7103 hydraulic bending machine is capable of bending a wide range of their profiles including 1080, 1200, 3000, 1280 & 3900 with supplied blocks, spacers, formers and fillers. Extra formers and fillers etc can be purchased to enable you to bend other types of their profiles. This quite a complicated system and has a few draw backs. The bend angle is limited to 90 degrees and done by eye, the fillers for the tracks are numerous and tricky to insert, and the bend radius is quite wide for all but the smaller tracks, and there are some serious calculations for the bend offset and bracket projections. Finally, at £1,190, it's beyond the reach of most independent fitters. I also had one of these that dumped it's hydraulic fluid onto the client's floor !
Enter the Forest Bending machine.

This machine benefits from it's simplicity, ease of operation, accuracy and price. With a single filler strip for the track, angle finder for bending to precise angles, the bend radius is only 10cms allowing nice tight bends, because of the simplicity it's quick to bend a track on-site making the fitter look good. Because it's quick, the bending charge is less; you can reverse bend too, and with the curving attachment you can do continuous curves or even arches. The price is only £245 plus VAT, and the curving attachment is also £245. This machine bends and/or curves the Forest KS & CKS tracks without affecting their warranty - which is a whopping 10 years giving you real peace of mind, and something no other curtain track has.
Why is there a charge for bending curtain tracks?
· The corners need to be supported by extra brackets
· The fitter has purchased a bending machine and bending on-site is a benefit to the client as this cuts down the number of visits required, so actually it's a saving !
· Track bending is a skill or art that has a cost implication - fitters have been on training courses and because they are more qualified than a fitter who cannot bend a track, they can ask for a surcharge.
The bending process

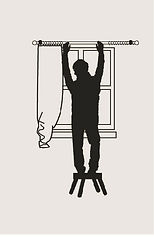
So here's a simple bay window. My client would like a single curtain with a right hand stack drawing across to the left. I have already fitted brackets with a 35mm projection, so you can see I need 1 internal bend and 1 reverse external bend

The brackets either side of the corners are spaced 15cm from the corners. I could have used top fix brackets here, but because there are 35mm brackets placed on the external part of the run, we have elected to keep all the brackets the same. You can see that I use a white screw cover with these brackets


Now I place off-cuts of track into the brackets and butt them up to each other. This gives me a measuring point, and so I'm measuring room side, or the front of the track. I'll do the internal bend first.

The angle finder is carefully pressed into the corner. We've already transferred our measurements onto the track, so now we're ready to bend. But we need to know that the track is in the correct place on the bending machine.


The initial mark on the left is placed over the inscribed line on the bending machine, and an extra line marked on the track in line with the edge of the machine. In this case I have drawn this on the wrong side simply so you can see it.
It's very important to put the filler in the track now, otherwise there will be tears !
Placing the track into the machine so that the off set mark lines up with the edge of the machine

With the wedge holding the track in place and angle finder fitted in it's slot, we are now ready to bend.

Double check your marks are aligned once more and then holding the machine steady with one hand, wind the handle so that the track bends round and lines up precisely with the angle finder.
Then give it a half turn or so more to allow for spring back.
Each machine will vary and older machines with a bit of wear may need more, newer ones less.
To remove your track, back-off the winding handle slightly, remove the axle and rotate the bending wheel/die out of the housing.
The wedge will drop out and the track is now loose.
You can now move on to the next bend, but firstly, be careful when working outside that you don't put the machine components down and get grit on them as this will damage the track when next they are used.
Remove the filler strip and move onto the next bending mark.


We should double check our bend angle - it's an external bend this time, so everything is a repeat of the above. There is no off-set to worry about in this instance, as the B-C measurement doesn't change for the bracket projection compared to the back wall measure, and the because this is a reverse bend, we invert the track, thus cancelling the bend off-set.
Do everything the same as you did for the first bend except this time, put the track into the machine the other way up.
So the start position looks like (left), and we bend exactly the same way until the track looks like (right)
I normally make the track oversize and trim down to fit, so having done that, I assemble the track with carriers and endcaps, as well as stop carriers and overlap master carriers if required. Quick wipe down with a cloth and clean off the pencil marks, snap into the brackets and tighten the clamps up and it should look like this:
On site time for this Forest KS was a bit over one hour. CKS tracks take a bit longer, as there is a bit more assembly to do. The client very kindly filled in the holes from the old Swish Deluxe.
Finally you can watch a video made by those funny folk at Forest - I would urge you in the strongest terms to mute the volume - the backing music is obscene.

